Yes! You heard it right. You can play games in the terminal and in this #TerminalTuesday series, I’ll show you how to play chess in Linux terminal.
You might be thinking, “why would anyone want to play chess in the terminal ?!”. I say, it’s a lot of fun. It is also challenging if you play against Stockfish.
Yes, there’s GNU Chess available, but it is not visually appealing and the chess engine “keeps thinking” for a long time.
I’m talking about an alternative to GNU Chess. Here are a few reasons you might enjoy this one better.
You get to play against one of the strongest chess engine, Stockfish. Here are the rankings for all the computer chess engines.
Visually looks way better than GNU Chess and is relatively faster as well.
You’ll learn how to describe chess moves in algebraic notation.
I figured that a pretty good chunk of It’s FOSS readers are geeks/nerds and that you guys would enjoy it.
To install terminal chess you need two components, the Stockfish chess engine and chs which is the UI which plugs into the chess engine.
Installing Chess in Linux terminal with Stockfish and chs
The terminal commands here are for Ubuntu or Ubuntu based distributions since a lot of people use them. These commands were tested on Ubuntu 20.04.
You can use your distribution’s package manager for installing the mentioned software.
sudo apt install stockfish
Running the above command will install the latest version of the Stockfish chess engine.
chs is the UI which plugs into the chess engine. It is written in python3 and you can install it using pip3 the python package manager.
Once you have pip3 installed, run the below command to install chs.
pip3 install chs
Cofiguring chs
After installing chs, you’ll see an error message saying chs is not on PATH. At this point if you try to launch chs, the terminal won’t know where to launch it from.
You can use the following command to fix the problem
export PATH="$PATH:$HOME/ .local/bin"
If you try to launch chs from the terminal, you’ll see a “FileNotFoundError”. This is a known bug in chs, it is not able to find the Stockfish chess engine to launch it.
To fix this issue we need to make a small edit in the chs python code. The file we are interested in will be located at /.local/lib/python3.X/site-packages/chs/engine/stockfish.py
Make sure to replace the the 3.X in the python version with the one installed on your computer. You can check the python version using the below command.
python3 -V
For me, it was Python 3.8. You can use Nano editor or your choice of text editor and open up the file.
In the line 13 of the code you’ll see engine_path = ‘stockfish_10_x64_linux’, you have to replace ‘stockfish_10_x64_linux’ like this
engine_path = "/usr/games/stockfish"
Now you’re finally done with all the setup. Type chs in the terminal to launch the game. This launches chs at level 1 difficulty.
You can specify the level of difficulty of the while launching the game as shown below.
chs level=8
Playing chess in Linux terminal
You play terminal chess using the algebraic notation (the name sounds complicated but it is quite simple) to describe the moves.
I’ll summarize a short version of how to play using algebraic notation, for detailed information you can check out this article. Chess pieces are represented by a single letter.
Knight – N
Rook – R
Queen – Q
King – K
Bishop – B
Pawns – blank, they don’t have an associated letter.
The chess board columns are represented by letters a to h and rows are represented by numbers 1 – 8. To move your pawn in the position a2 to a4 you just write a4.
To move your knight(N) from g1 to h3 you would write Nh3.
To capture a pawn you have to add an x in the command. Here I’m trying to capture the bishop(B) which is in the position c4 using my knight(N). The command for this is Nxc4.
The Stockfish engine also gives you suggestions when you type an invalid command or when there are multiple possibilities for a command. You can use the command hint and the chess engine will give you a hint for the next move.
You can also use the back which takes back your last move(s), this will help you cheat or revise the game depending on how you see it.
Closing thoughts
If you find the chessboard to be very tiny, you can scale it up and play around with different fonts. Both Stockfish and chs are open source and you can easily get your hands dirty and mess around with the code for your own projects (if you want).
If you want to try out the good old GNU Chess, you can install it using the command below.
sudo apt install gnuchess
Let me know how your game went in the comment section :)
After weeks of leaks and rumors, Poco has officially announced the arrival of a new Poco device — POCO X3 NFC. The device is a successor to the Poco X2 that was launched in February.
In a tweet, Poco has said that the device will be unveiled on September 7th at an online event, and that the live stream will begin at 20:00 (GMT+8).
Well, considering our #POCOLeaksKing@anguskhng has leaked everything already. We decided to make it all official!
A few specifications of Poco X3 are still a mystery, but there are no doubts that the device will be a performance champ. Qualcomm has said that Poco X3 will be the first device to come with Snapdragon 732G.
Qualcomm Snapdragon 732G is a gaming-focused chipset that offers an improved GPU and CPU over the Snapdragon 730. Qualcomm claims the chip can deliver Adreno 618 GPU, which will be a boost in graphic rendering. The chip supports Bluetooth 5 and is ready for WiFi 6.
At the chipset announcement, Sam Jiang, Poco Global head, said, “We are extremely excited about the upcoming POCO smartphone and our collaboration with Qualcomm Technologies that allowed us to create the first device on the market with the latest Snapdragon 732G Mobile Platform.”
Other rumored POCO X3 NFC specifications are a 6.67-inch display with a 120Hz refresh rate, 5,160mAh battery, and 33W fast charging. Users speculate that the device will have an AMOLED panel.
Poco Global product marketing manager Angus Kai Ho Ng said the device would have a 64MP primary lens. It will most probably be a quad camera setup. In his tweet, he also shared a few shots taken from the Poco X3. He also confirmed fast charging support in another tweet and said the device could be fully charged in about 65 minutes.
Testing out the camera set-up with the latest #POCOX3
It's really more than just a normal 64MP
Lots of cool awesome features to share very soon!
Version 200831 of Garuda Linux, an Arch-based desktop Linux distribution with a graphical installer and system management tools, and available in several popular desktop flavours, has been released: "Garuda Linux release 200831 - this is an ISO image refresh released today. Changelog: Garuda Welcome app - added a....
from DistroWatch.com: News https://ift.tt/31L5iGX
via IFTTT
Nextcloud, the popular open-source Infrastructure-as-a-Service (IaaS) cloud, now enables you to automatically scan your files for malware before they can be stored in your private cloud.
from ZDNet | open-source RSS https://ift.tt/3bbJ97H
via IFTTT
Christopher Nolan’s much-awaited sci-fi movie ‘Tenet’ premiered this week. As expected, the title has been a trending search on Google and torrent sites.
The blockbuster title has caused a storm on the internet, and torrent uploaders are making the most of it by tricking users into downloading fake torrent files.
If you’re looking forward to downloading the movie, we must warn you that there is no ‘real’ Tenet torrent available as of now. Websites and torrent sites are flooded with fake pirated torrents of the movie.
If you search Pirate Bay for the Tenet movie, you’ll see hundreds of torrent links of fake pirated Tenet movies. Chances are that some of these phony torrent files could drop malware on your device and lure you into entering your bank account details.
For instance, guys at Torrent Freak tried downloading a Tenet torrent from Pirate Bay and ended up with a 700MB file. The file showed a still image and asked people to go through the ReadMe file and install a codec required to play the video.
The text in the ReadMe file directed them to a suspicious website that required credit card details for “verification purposes”. From there it was obvious that the uploader was trying to dupe them.
Top rated torrent sites are aware of the piracy storm Tenet could bring. As they deploy measures to curb it, the popularity of Nolan’s movie could drive some novice users to download fake torrent files that could siphon off money from their bank accounts.
Nevertheless, we do not support piracy and recommend our readers wait for the theatre’s release or wait until it is available on an OTT platform.
A brand new version of Blender, the open source 3D modelling software (and then some), is now available to download. In this post we look at what's new.
Mobile, cause that's what plants crave. Here's a review of Firefox 79 for Android, tested on a Motorola Moto G6 phone, covering installation and initial setup, bookmarks and settings, available addons, interface customization, tab management, privacy and security, day-to-day usage, overall efficiency, responsiveness, other oservations, and more. Will the inner nerd in you be happy? Take a look.
from Dedoimedo RSS https://ift.tt/2EQFRL3
via IFTTT
EasyOS is an experimental Linux distribution which uses many of the technologies and package formats pioneered by Puppy Linux. EasyOS continues to improve its container technology, security features, and update its Debian-based packages. The project's release announcement offers the highlights of EasyOS 2.4.1: "EasyOS 2.4.1 has significant and....
from DistroWatch.com: News https://ift.tt/2EUGy5N
via IFTTT
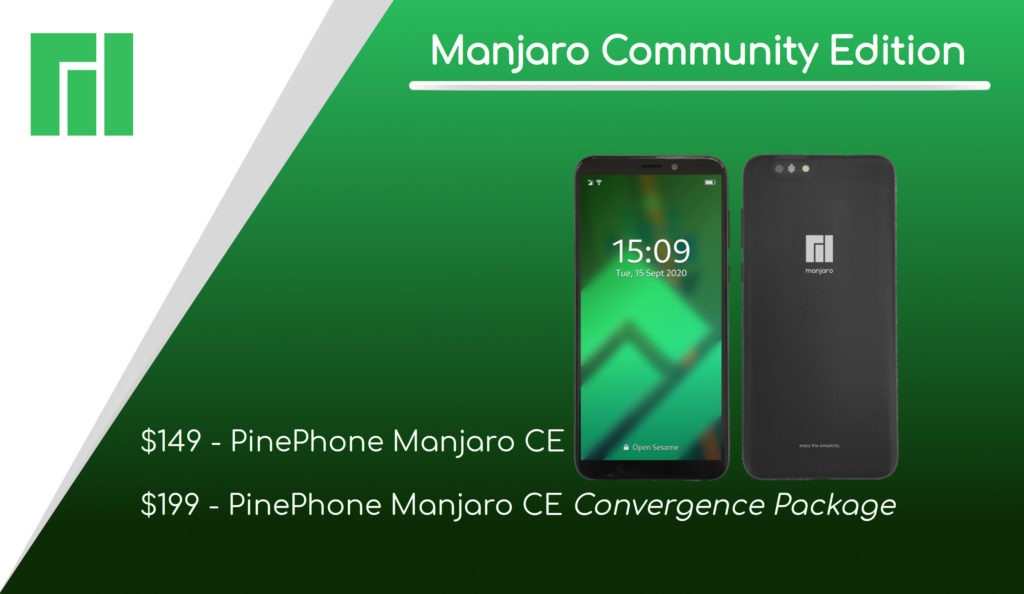
After launching the two Community Edition (CE) of Linux-based PinePhone with Ubuntu Touch and postmarketOS, PINE64 has announced that the next PinePhone CE will officially feature Arch Linux-based Manjaro operating system by default.
Just like PinePhone postmarketOS CE, Manjaro Community Edition will also come in two hardware variants: Regular and Convergence Package, along with the same PCB (Printed Circuit Board) version 1.2.
As usual, the regular editions will cost $149 offering 2GB of RAM and 16GB of eMMC; the Convergence Package will cost $199 providing extended 3GB of RAM and 32GB of eMMC bundled with a USB-C dock.
PinePhone Manjaro Community Edition
On the software side, it will ship a user-friendly Arch-based Manjaro ARM rolling distribution. Manjaro supports nearly all of PINE64 SBCs (Single-board computers) and devices including PinePhone, PineTab, and Pinebook Pro.
For touch/mobile devices, Manjaro is already working to provide out-of-the-box support for mainly three mobile user interfaces: UBport’s Lomiri, Purism’s Phosh, and KDE-based Plasma mobile. However, it is yet to be announced which one of these will land on the PinePhone CE.
Lastly, this PinePhone edition with Manjaro will arrive in a custom presentation box designed by Manjaro’s development team. It will also feature a sleek-looking Manjaro brand logo on the back cover.
When And How Can You Buy PinePhone Manjaro CE?
PinePhone maker PINE64 has revealed that the pre-order of Manjaro CE will open in mid-September. Then, you’ll be able to place an order from the official PINE Store.
After rolling out premium smartphones with a $1,000 tag, OnePlus has made a return to the budget smartphone segment with OnePlus Nord. Launched at Rs 24,999 in India, it is one of the most popular budget smartphones these days owing to the features it packs.
Since OnePlus Nord is a budget smartphone, the company had to make some tradeoffs to keep the price minimum. Some of the shortcomings of OnePlus Nord are the plastic frame, mono speaker, lack of UFS 3.1, and more. Here is a list of 5 things missing from OnePlus Nord. Keeping aside these shortcomings, one of the significant issues faced by OnePlus Nord is the green tint issue.
Within a week of its sale, several OnePlus Nord users complained that they were facing green tint display issues on their smartphones. Before the OnePlus Nord display issues, the company received quite a flak for green tint and black crush issues on OnePlus 8 Pro, a $1,000 premium device.
If you own OnePlus Nord, there is a chance you might have unknowingly come across the OnePlus green tint display issue. Here’s how to check whether your smartphone is suffering from the issue or not.
OnePlus Nord Green Tint Display Issue: What is it?
The green tint is a very common issue in smartphones with an AMOLED panel, and OnePlus Nord is no exception. In layman’s terms, when you’re using the smartphone in a dark environment with brightness at around 10-15%, and if there is a grey or dark-colored background on the screen, some areas appear to be green. This issue is a result of faults in the manufacturing process of the AMOLED panel.
However, OnePlus has clarified that “this is characteristic of all OLED displays and the degree of discoloration will vary depending on other properties of the display. This is not a quality issue and will not affect daily usage or the durability of the screen.” (via 9to5Google)
OnePlus Nord Green tint Display Issue: How to check?
To see if your OnePlus device is facing a display issue, here is what you need to do:
.Go to a dark room or create a dark environment by closing the doors/windows of your room.
Next, put your OnePlus Nord on flight mode and open the Chrome browser in dark mode.
Visit any website so that it displays a black screen with the message “No internet”
Turn off ‘Adaptive brightness’ and slowly lower the brightness level to around 10-20%
If you can now see OnePlus Nord’s AMOLED screen exhibiting green tinting or pinkish tint towards the lower half of the display, your OnePlus Nord is suffering from display issues.
If you’re not seeing any color casting or any discolouration, your unit might not have the issue we’re talking about.
Here is a video for your reference:
OnePlus Nord Display Issues: What can you do about it?
Since OnePlus has clarified that green tint issues in OnePlus Nord are an inherent property of AMOLED panels, there is pretty much nothing you can do about it. If your OnePlus Nord is exhibiting the worst green tint issues, you can report it at OnePlus Forum and wait until the support staff picks up your issue. Since several people have reported the issue on Reddit as well as OnePlus forum, there are chances that OnePlus might look forward to resolving this issue with a software update if possible but the chances are really slim.
PUBG Mobile players are incredibly excited about the upcoming Update 1.0, which will revolutionize the game. We already know that the new update will finally introduce Erangel 2.0 while also releasing the Ultra HD graphics for the game.
However, players still don’t know much about the 1.0 Update, which will be released on September 8th. For instance, the fan-favorite ‘Infection Mode’ is coming back in PUBG Mobile Update 1.0, which is pretty exciting.
“Infection Mode” was first introduced on PUBG Mobile last year with the 0.14.0 update. However, the game was only available for a limited time.
In the game mode, 12 players are divided into two teams, i.e., Defenders and Zombies. To win, Defenders have to protect themselves until the timer runs out, whereas Zombies have to infect Defenders to win.
PUBG Mobile didn’t officially announce the comeback of Infection Mode for Update 1.0; however, the game mode is already available to play in the Beta version. So, it’s quite evident that the game mode will be released in the global version of PUBG Mobile as well. Also, players will have to be at Level 5 to unlock the ‘Infection Mode.’
PUBG Mobile Infection Mode
Besides the Infection Mode reintroduction, PUBG Mobile Update 1.0 will also release an upgraded version of Payload game mode.
The Payload 2.0 game mode is going to make things a lot more exciting on PUBG Mobile. That’s because it will introduce helicopters, UAV, Anti bomb Suit, Radar, and a lot of other fantastic features in PUBG Mobile.
The third PinePhone community edition has been revealed — and if you’re a Manjaro fan you’re in for a treat. Pine64 has confirmed that the next PinePhone ‘Community Edition’ will come pre-loaded with the popular […]
A new version of Q4OS, a Debian-based desktop Linux distribution offering a choice of a classic-style user interface (Trinity or TDE, a fork of KDE 4) or the modern KDE Plasma desktop, has been released: "An update to Q4OS 3 'Centaurus' LTS has been released. The new 3.12....
from DistroWatch.com: News https://ift.tt/2YLWTAP
via IFTTT
Over the years, Microsoft hasn’t stressed more on improving hardware compatibility on Windows 10 OS. As a consequence, most of the device drivers are either preloaded or shipped via feature updates. It’s no doubt it has brought a seamless experience for the users.
Still, every now and then you’d find users complaining about no sound after Windows 10 update or problems related to other components. Here, even the latest Windows 10 2004 isn’t any different.
Due to the external hardware and Windows software conflicts, mostly on third-party hardware, Windows users might experience some problems in audio and video performance. In this guide, we are going to tell you how to fix the audio issue in Windows 10.
In the past, from the deletion of new files to drivers abruptly stopping, Windows users have faced various problems. Moreover, the situation was getting so severe that Microsoft was forced to pull the October update before it disappoints any other Windows 10 users.
In this article, we will be addressing the Windows 10 sound issues. Of course, you will always have the option of rolling back to the previous version, but we will keep that for the end. On its website and YouTube page, Microsoft has published a set of videos to tell you how to fix audio issues in Windows 10. So, I’ll be telling you that as well.
How to fix audio issues in Windows 10 using the basics
This is the pretty basic and very first step to fix audio issues in Windows 10. You need to first check out your speakers and headphone connections and see if some audio cable is loose or connected to the wrong jack.
Now check your volume levels from the audio icon, and don’t forget to check the volume levels of your external speakers.
Sometimes your external speakers might be the reason why you are reading this how to fix audio issues in Windows 10 article. Don’t forget to check them with the device other than your Windows 10 PC.
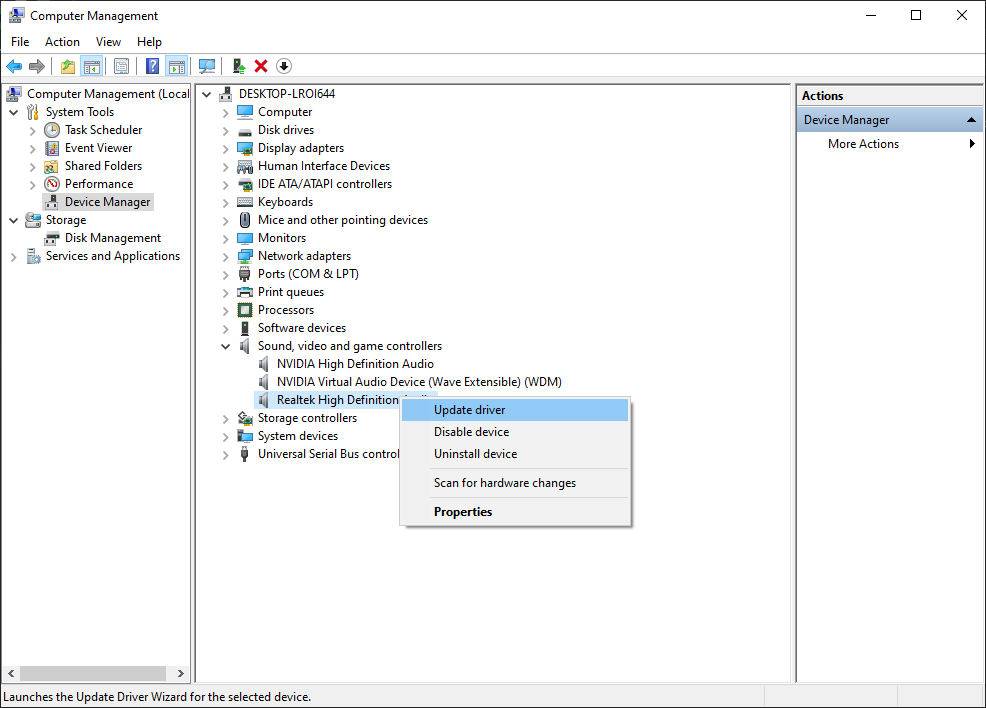
Use Device Manager to fix audio issues in Windows 10
Another reason why your Windows 10 PC might be giving your problems could be related to the driver issues. Make sure that your sound card is working properly and is running with updated drivers.
To fix audio issues in Windows 10, just open the Start and enter Device Manager. Open it and from a list of devices, find your sound card, open it, and click on the Driver tab.
Now, select the Update Driver option. Windows should be able to look at the internet and update your PC with the latest sound drivers. If it fails to do so, you can find the right drivers at your PC manufacturer’s website.
Alternatively, you can try to update the drive using the generic audio driver that comes with Windows. For this –
Select Update driver > Browse my computer for driver software > Let me pick from the list of available drivers on my computer > High Definition Audio Device > Next > Install it.
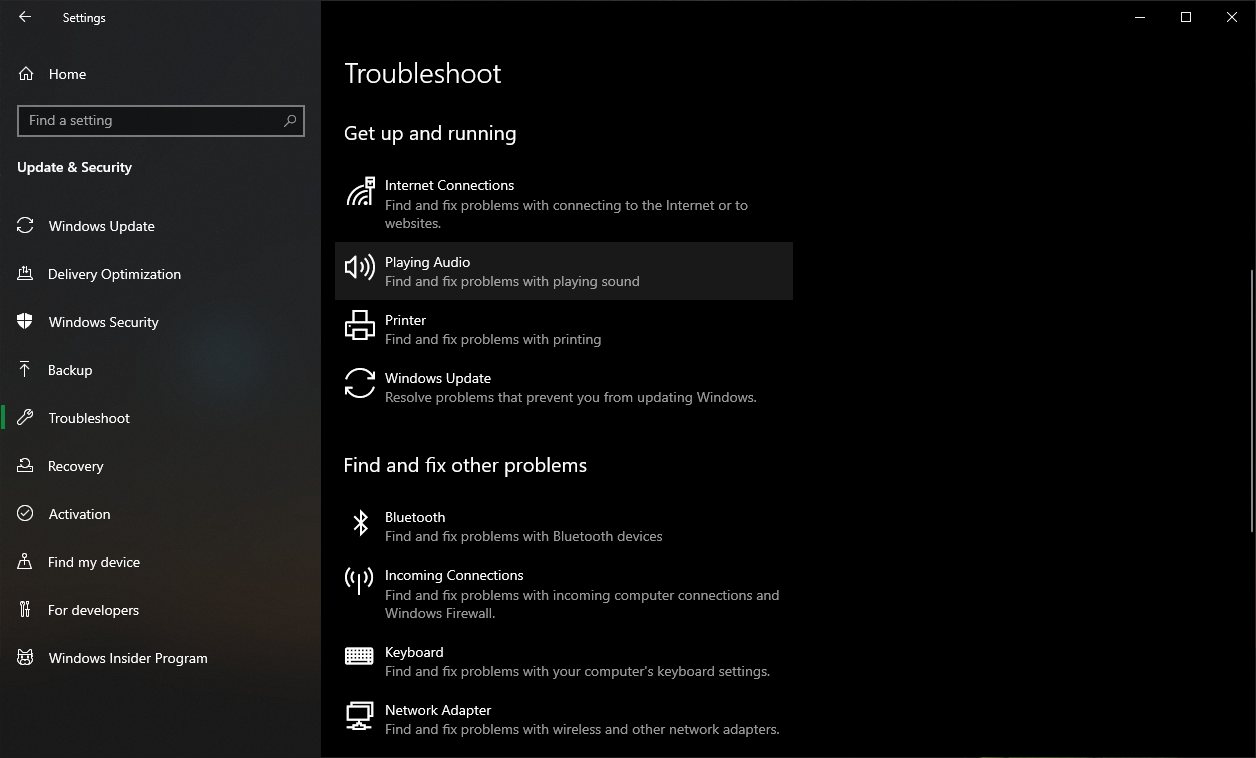
How to fix audio issues in Windows 10 by running the troubleshooter
Troubleshooter is always the first thing one should do after any sort of issue in Windows 10. Gone are the times where the troubleshooter was never able to identify issues; the Windows 10 troubleshooter works very efficiently.
To run the audio troubleshooter in Windows 10, go to Windows 10 Settings > Update and Security > Troubleshoot > Playing Audio.
Just follow through the steps, and the Windows 10 Troubleshooter will automatically fix any sound issue that you are facing.
Set default playback device to fix audio issues in Windows 10
You might face some audio issues while using USB or HDMI as you need to set the external devices as default. Audio enhancements can sometimes interfere with the hardware drivers. Thus it is important to disable them until a new driver update arrives on your PC.
To fix audio issues in Windows 10 by setting the default device option, just open Start and enter Sound. Now open the appropriate result and click on the Playback tab. Here find the suitable audio device and Set Default.
Fix audio issues in Windows 10 by choosing correct audio playback
To choose the correct default playback in Windows 10, just open Start and enter Sound. Now open the appropriate result and click on the Playback tab. On your default device, right-click and select Properties. On the Advanced tab, under default format, change the setting and hit the Test button. If it doesn’t work, change the setting and hit Test.
We hope that these tips will help you to fix sound issues in Windows 10 when audio not working on laptop or other device. If you have some other suggestions or problems, comment below.
If these problems persist, you could head over to Microsoft Support Desk and tell them your problems.
Towards the end of April 2020, Lenovo announced its collaboration with the Red Hat-sponsored community project, Fedora Linux. It aimed at bringing Lenovo’s ThinkPad P1 Gen2, ThinkPad P53, and ThinkPad X1 Gen8 laptops with Fedora 32 pre-loaded.
Finally, after a worthwhile wait of over four months, Lenovo has started offering its ThinkPad laptops with a pre-installed Fedora workstation. As of now, ThinkPad X1 Carbon Gen8 is the first laptop that is now available to buy, while others are still to come.
Lenovo ThinkPad X1 Carbon Gen8 With Linux
X1 Carbon Gen 8 is a 14-inch, thin, and lightweight premium laptop powered by a 10th generation Intel Core i5-10210U processor with 4 cores, 8 threads, and up to 4.20 GHz turbo boost.
Its base model, which is priced at $1287 USD, comes with a 1080p Full HD IPS panel display. However, Wide Quad HD (1440p) and 4k Ultra HD IPS displays are also available at the cost of extra money.
If you care about the battery life of your laptop, this ThinkPad X1 Carbon Gen8 with Fedora might interest you a lot. This is because it claims to give up to 19.5 hours of battery life with Rapid Charge boosts up to 80% in just an hour.
Among the others, here is the list of specifications of a fedora-powered X1 Carbon Gen8 laptop:
Memory: up to 16GB LPDDR3 2133MHz (Soldered)
Hard Drive: up to 1TB PCIe SSD
Camera: 720p HD
Wireless: Intel Wi-Fi 6 AX201 802.11AX with vPro (2 x 2), Bluetooth 5.0
Fingerprint Reader
Keyboard: Backlit – US English
Now, if you’re interested in buying Lenovo’s ThinkPad X1 Carbon Gen8 with Fedora Linux OS, place an order from here.
Just to remind you, in June 2020, Lenovo also promised to certify its entire P-series ThinkPad laptops and ThinkStation PCs for top Linux distros, Ubuntu, and Red Hat Enterprise Linux (RHEL).
Hence, along with the upcoming Fedora-powered ThinkPad P1 Gen2 and P53, Lenovo will also roll out its workstation computers with Ubuntu and Red Hat Linux desktops.
When it comes to the best cars under Rs 6 lakh for the high daily driving requirements of more than 1,000 km per month, petrol cars with CNG options are the best choice. Today, we will be exploring the best cars under Rs. 6 lakh in India that offer great value for money, performance, and fuel efficiency so that one can use them for their daily usage without any problem.
We have chosen three main cars, Maruti Suzuki Wagon R, Tata Tiago, and Maruti Suzuki Celerio. We will be taking a look at the best value for money variant of each of these cars. Both cars from Maruti Suzuki come with a factory-installed CNG option, but with advancements in the aftermarket CNG, cars with no CNG options like Tata Tiago can be retrofitted with a cylinder to return excellent fuel efficiency. As for the question of engine warranty being voided due to aftermarket CNG installation, we will also provide you with a solution for the same.
Best Cars Under Rs 6 Lakh: Maruti Suzuki Celerio
Image: Maruti Suzuki
Maruti Suzuki Celerio is one of the most popular budget CNG cars in India. Very recently, cab aggregators have also started using Maruti Celerio CNG as a fleet car. Maruti Suzuki Celerio is available in Petrol as well as in CNG options with prices starting at Rs 4.41 lakh (ex-showroom). But we recommend the Maruti Celerio VXI (O) CNG variant of the Celerio priced at Rs. 5.72 lakh (ex-showroom), to get the best bang for your buck. Despite being a small hatchback, it provides plenty of cabin space, decent quality interior plastic, and excellent highway stability.
Due to its wide stance, Celerio can maintain a high speed without any issues. If your commute involves a lot of highway driving then Maruti Celerio is a great option.
Maruti Celerio Petrol: Review
Maruti Suzuki Celerio is powered by a BS6 compliant 1-liter 3-Cylinder petrol engine that churns out around 67 BHP and 90 Nm of peak torque. Despite being a 3-Cylinder engine, Celerio is quite refined. If we talk about its real-world performance then according to one of the owners it’s perfect as long as you drive it below a speed of 120 km/h. He said if you go beyond that then the car will struggle, which is acceptable considering its segment.
In terms of comfort, one of the owners of Maruti Celerio said that he is 5’11” tall still the driver’s seating position was quite comfortable for him. However, few owners have had mixed reviews about the legroom from the driver’s point of view. Apart from that, Celerio has a good amount of ground clearance.
One of the best features that many owners feel is its front visibility which enhances the driving experience. Well moving forward towards the mileage of Maruti Celerio, the car has comfortably delivered a fuel-efficiency of around 23 km/l with its BS4 variants. However, with the new BS6 compliant engines, the automaker claims that Maruti Celerio can deliver a fuel economy of up to 21.63 km/l on highways. If we talk about city and hilly regions, it can safely churn out a fuel-economy of around 18 km/l. Maruti Suzuki cars are known for their excellent fuel economy and Celerio is no different.
Maruti Celerio CNG Review
Image: Car Duniya
2020 Maruti Celerio comes with a factory-fitted CNG option, which makes it one of the best budget CNG cars under Rs. 6 lakh in India. The biggest perk of having a CNG car is obviously the higher mileage. In the case of Celerio, the automaker claims to have a mileage of 30.47 kg/km. According to its owners, one can easily get a fuel economy of 25 km/kg in the city and 28-29 km/kg on highways while driving Celerio CNG.
Maruti also provides a separate digital fuel meter for CNG on the MID, which is very handy. Apart from this, the most obvious downside of getting a CNG fitted car is the loss of boot space and the same is with Maruti Celerio. However, due to Maruti Celerio being a factory-fitted CNG car, the performance on CNG is quite impressive. According to one of the reviewers, one cannot get the same level of tuning in an aftermarket CNG as they get in a factory fitted one. Most of the time while driving Maruti Celerio on CNG mode, the car delivers the same performance as it’d in the case of a petrol car.
Best Cars Under Rs 6 Lakh: Tata Tiago
Image: Tata Motors
With a four-star rating in the global NCAP crash test, Tata Tiago is the safest car in its segment and the segment above it as well. In terms of safety, it is outmatched only by its big brother Tata Altroz, which is a premium hatchback. Tata Tiago is available only with a BS6 compliant 1.2-liter 3-Cylinder petrol engine available in both manual and automatic transmission. The price of Tiago starts at Rs 4.60 lakh (ex-showroom). Unlike Maruti Suzuki Celerio and WagonR, Tata Tiago is not offered with a factory-fitted CNG kit.
The best value for the money variant of Tata Tiago is the Tata Tiago XZ Plus, which comes with alloy wheels, touch screen, cooled glove box, and a lot more. However, in order to stay true to the title of this article, we will recommend the Tata Tiago XT version priced at Rs. 5.20 lakh (ex-showroom) that you should go for. You can also go for the Tata Tiago XE version, but personally, we won’t recommend it because the manual window placement in this variant is in an awkward position. Even if you plan to install aftermarket windows in XE, the window switch will hit your leg from the side. There’s a way to get it done, but the procedure will leave a hollow space in place for the original manual window switch.
Tata Tiago Petrol
In terms of performance and handling, Tiago is one of the best cars within the given price range. Under the hood, a 1.2-liter three-cylinder Revotron BS6 compliant engine powers the car with a maximum output of 84 BHP and 113 Nm torque.
As per several owner experiences, one may not get an instant torque while accelerating the car but there will not be any power lag. Tiago delivers a constant power output even at higher speeds. However, in the updated BS6 Tata Tiago, the engine is very peppy and delivers a much better pickup compared to the previous generation. Tiago is very stable on highways and cornering which enhances the driving experience. One of the main highlights of the Tata Tiago is its responsive steering. The city driving in the car is very easy as the steering is easily turned using a single finger and returns to the center after taking the turn. There is no “dead-spot” in the steering and it is very responsive. Even the slightest turn is registered on the road. Driving the Tata Tiago is an engaging experience.
Image: Tata Motors
Additionally, Tata has provided a premium interior along with comfortable seats and sufficient room inside the cabin. If we talk about its most highlighting features then it’s the Harman and Kardon speakers in every model except XE. In terms of real-world mileage, Tata Tiago delivers 20 km/l on highways and about 16 km/l in the city.
When it comes to the shortcomings of the car, then it’s the engine noise and vibrations. However, both of these issues have been resolved to a really great extent in the BS6 Tata Tiago facelift variant.
Tata Tiago With After-Market CNG Kit
Image: DDS
Tiago is not offered with a factory-fitted CNG kit. However, some users get it done by installing an aftermarket CNG in Tiago. One of Tiago’s owners had installed a Tomasetto sequential kit with a 12kg cylinder capacity which cost him Rs 31,000. The price of the CNG kit may fluctuate depending upon the quality of the CNG kit. As per this report, Tiago delivers a mileage of around 25km/kg in CNG mode.
In terms of performance, he felt power lag at low RPMs in CNG mode, however, the power delivery was quite smooth after the third gear. This is a problem in several after-market CNGs. However, several CNG kits with advancers claim to deliver performance close to a factory fitted one. Lovato CNG kits are best suited for Tata cars, according to one of the owners.
Getting an aftermarket CNG can void the warranty of a car’s engine. To counter this problem, you can go for a dealer fitted CNG option. Several Tata dealers offer the facility a dealer-fitted CNG kit, which is approved by the showroom and does not cause any voidance of the warranty. Usually, these showrooms have a tie-up with a Government-authorised CNG kit dealer, which does the installation on behalf of the Tata showroom.
Such an option would be slightly more expensive than buying an aftermarket CNG on your own. But it’s worth the peace of mind. For those who do install an aftermarket CNG all by themselves, Lovato CNG kits are the best option and they usually run without any issues. Just make sure to get it installed at a Government-authorised service center.
Similar to the factory-fitted CNG, you can get a fuel-filling pump in Tata Tiago near its petrol filling lid. This can be done via a special request from your dealer.
Best Cars Under Rs 6 Lakh: Maruti Suzuki Wagon R
Image: Maruti Suzuki
The new Wagon R is offered in three different engine options: a 1.0-liter three-cylinder petrol engine along with a CNG option and a 1.2-liter four-cylinder option. All variants other than the CNG are available with an automatic transmission option, and the CNG version is only available with an MT. Prices for the new Maruti WagonR starts at Rs 4.45 lakh (ex-showroom).
The best value for money variant of Maruti Suzuki Wagon R is the Wagon R LXI (O) CNG priced at Rs. 5.25 lakh (ex-showroom), which comes with factory fitted CNG. There is also a WagonR VXI 1.2-Liter option. But I’ll explain why you should and should not go for it later in the article.
Maruti Wagon R: Petrol
Image: Maruti Suzuki
On paper, the 1.0-liter engine generates 67 BHP and 90 Nm of torque, while the 1.2-liter engine produces 82 BHP and 113 Nm of peak torque. As per their power output, the 1.0-liter engine offers decent performance, whereas the 1.2-liter is quite punchy in power delivery. Additionally, the 1.2-liter engine provides a good engine response and it quickly achieves a speed of 100 km/h. However, the car has a noticeable amount of body roll on turns, which is not a good sign. The high body roll in Wagon R also defeats the purpose of having a bigger 1.2-liter more powerful engine. As the car will feel unstable at high speed and if driven slow it’d be unable to utilize all of its power.
Apart from this, Maruti Wagon R has ample headroom and boot space. The new Wagon R is bigger than before and has the largest boot space in its segment. It’s designed to be more comfortable than its sibling Celerio and deals with road bumps and patches quite effectively.
Maruti Wagon R: CNG
Image: Indian Autos Blog
Maruti provides a factory-fitted CNG kit in Wagon R, which is totally hassle-free. Wagon R has quite a smooth power delivery in CNG mode. In terms of mileage, the CNG variant of Wagon R with a claimed fuel economy of 32.52 km/kg, has the best figure out of all three cars here. The boot space in Wagon R is also reduced by a good amount, but since the car has a big 310-liter space the CNG cylinder leaves plenty of room for luggage.
Best Cars Under Rs 6 Lakh: Which One To Buy?
All the above-mentioned cars are among the best selling cars in their segments. All of them have their own perks and drawbacks. Moreover, it depends on individuals’ requirements which one suits them the most.
Celerio is a good option for those looking for a decent performing car with great handling and high-speed stability. Also with its CNG variant, you can achieve a higher mileage.
On the other hand, go for Maruti Suzuki if you prefer to drive slowly and want a spacious cabin. It’s a highly fuel-efficient car addition and it has plenty of boot space making it suitable for carrying more luggage. Furthermore, its factory fitted CNG variant makes it a hassle-free fuel-efficient car to own, just like the Celerio.
For those asking “Why should we buy Tata Tiago?”. Well if you want a well-built and fun-to-drive car, then Tiago is the best option for them. Tata Tiago is also very impressive in terms of ride quality and high-speed stability. The small hatch also has a world-class suspension that offers plush ride quality even on the bumpiest of roads. The after-market CNG is a small price to pay for all the benefits you get from a well-built car.
Moreover, as I said earlier it depends more on your purpose of buying a car.
Anyway, do share your views in the comments section below on which one will you go for and why?


 The third PinePhone community edition has been revealed — and if you’re a Manjaro fan you’re in for a treat. Pine64 has confirmed that the next PinePhone ‘Community Edition’ will come pre-loaded with the popular […]